
What Are the Best Concrete Screws for Your Project?

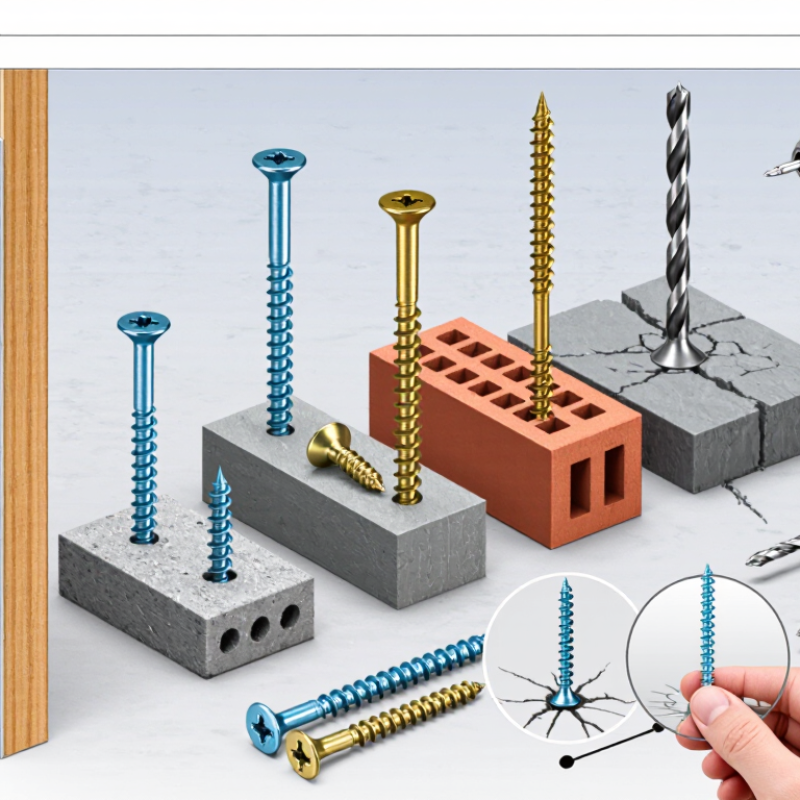
Choosing the best Concrete Screws starts with the surface beneath them. A screw that holds firmly in poured concrete may perform differently in a hollow block or a cracked slab. Match the fastener to the base material, expected load, exposure, and installation method. Small details matter. Dust left in a pilot hole can weaken the grip, while a hole drilled too wide may leave the screw spinning. The right choice should feel deliberate, not guessed.

This guide compares screw styles, coatings, diameters, lengths, and compatible drill-bit sizes. It also explains how to check manufacturer specifications and install fasteners without damaging the surrounding concrete. For a wall-mounted shelf, that means considering the shelf’s weight and the condition of the wall—not just choosing the longest screw. For outdoor work, corrosion resistance deserves attention. There is no universal winner. Sometimes the practical answer is less convenient than expected.

A named expert quotation should be verified against its original source before publication. No source was provided here, so attributing an invented statement to a real person would undermine trust. Check the product’s technical data and follow its installation instructions; when loads are structural or uncertain, ask a qualified professional to assess the application. That extra check can prevent a loose bracket, a cracked edge, or a repair that costs more than the fasteners.
What Are the Best Concrete Screws for Your Project?

Understanding Concrete Screws and How They Work

A concrete screw cuts its own thread into a predrilled hole. As the screw turns, its hardened threads displace small amounts of concrete and grip the hole wall. The connection depends on more than screw diameter. Hole depth, embedment, concrete strength, edge distance, and cleaning all matter. Dust left inside the hole can prevent full engagement. A brush and vacuum are small steps, but easy to skip.

Industry evaluation documents help explain why load capacity cannot be guessed from appearance. ICC-ES AC193 covers testing of mechanical anchors in concrete, while ICC-ES evaluation reports publish load data for specific anchor sizes, embedment depths, and concrete conditions. ACI 318-19 Chapter 17 also addresses anchor tension, shear, spacing, and edge effects. Check the applicable report rather than borrowing a load figure from a different screw or installation. That part is easy to get wrong.

For a shelf near a concrete edge, for example, a deep screw may still be unsuitable if the required edge distance is missing. Use the specified drill bit and installation method; an oversized or angled hole can reduce reliable engagement. Not every job needs the same screw. And the published capacity assumes correct installation, not a rushed hole full of dust. I would still verify the substrate and report limits before choosing a size.

Comparing Screw Types, Materials, and Coatings

Concrete screws differ in how they cut into masonry, resist corrosion, and handle heavy loads. Standard hardened-steel screws are common for indoor fixtures, such as fastening a shelf bracket to a basement wall. Their threads bite directly into a correctly drilled pilot hole. For heavier loads, check the screw’s rated capacity and the concrete condition; a cracked edge can change the result.

Material matters most where moisture lingers. Stainless-steel screws resist rust in damp areas, though the exact grade should suit the exposure. Near salt air or de-icing chemicals, verify the manufacturer’s guidance rather than assuming all stainless steel performs alike. Coatings offer another trade-off: zinc-coated screws often suit dry interiors, while specialized protective coatings may provide better resistance outdoors. Coating names can be confusing. Read the product data.

Installation details matter as much as the screw choice. Match the drill bit diameter and hole depth to the instructions, then clear dust from the hole before driving. A dusty hole can make fastening less reliable. Use steady pressure, not maximum force; overtightening may strip the concrete or damage the screw. I would not choose by color or price alone, though those are tempting shortcuts. Check the base material, expected load, and exposure first.

What Are the Best Concrete Screws for Your Project?

Comparing typical material and coating choices by exposure condition

The 1–5 scores are a qualitative comparison, not a standardized test or a product rating. Stainless steel generally offers greater corrosion resistance than zinc-plated carbon steel, with Grade 316 typically preferred over Grade 304 for chloride-rich environments. Always check the screw’s approval, coating specification, and suitability for the concrete and exposure conditions.

Matching Screw Size and Design to Your Project

Choosing concrete screws starts with the load and base material, not the screw’s appearance. Check whether the connection carries tension, shear, or both, and establish the concrete strength and condition. ACI 318-19 Chapter 17 addresses anchor failure modes, edge distance, and spacing. Small clearances matter. A screw close to a slab edge may behave differently from one set well inside the concrete.

Match diameter and embedment to the required capacity and the thickness of the fixture. Longer is not automatically stronger: insufficient base thickness or nearby reinforcement can limit installation. ICC-ES AC193 evaluation reports provide product-specific test results and installation limits for concrete screw anchors. Use the report for the exact screw size, embedment, and concrete condition; do not transfer a capacity from one configuration to another. ASTM C39/C39M describes compressive-strength testing of concrete cylinders, which helps verify the strength value used in design.

Drill-hole diameter, depth, and cleaning also affect performance. Follow the tested installation instructions, and check that the screw will not bottom out before clamping the fixture. It is tempting to select a larger screw as a safety margin. That shortcut can be wrong. A quick field check may catch a mismatch, but it cannot replace the design data. One detail is easy to miss.

Choosing Concrete Screws for Different Applications

What Are the Best Concrete Screws for Your Project?

Choosing concrete screws starts with the material and the job. For a light shelf in solid concrete, select a screw rated for the expected load and long enough to achieve the specified embedment. A bracket holding a gate or equipment needs a more careful assessment, including load direction, vibration, and the number of fasteners. Check the screw’s published capacity for your concrete type; ratings can vary with strength, thickness, and installation method. Small details matter.

For brick or concrete block, identify whether the fixing will enter solid masonry or a hollow section. A screw suitable for solid concrete may not perform the same way in hollow block. Outdoors, consider corrosion resistance, especially near sprinklers or coastal air. Drill the correct diameter and depth, clear dust from the hole, and keep the required distance from edges. Follow the fastener instructions. Don’t guess.

It is easy to focus on screw length and overlook the fixture itself. A thin bracket can bend before a properly installed fastener reaches its limit. I’d check the whole connection, not just the screw. That extra check can feel fussy, but it is worthwhile.

What Are the Best Concrete Screws for Your Project? - Choosing Concrete Screws for Different Applications

Application Typical Screw Diameter Length Selection Suitable Base Material Key Selection Considerations
Light-duty fixtures, clips, and small brackets 3/16 in. or 1/4 in. Choose a length that allows the screw to pass through the fixture and achieve the embedment specified for the screw and base material. Sound, solid concrete or suitable solid masonry Use the specified drill-bit diameter and clean the hole as directed. Do not rely on screw diameter alone to determine load capacity.
Timber battens, furring strips, and light framing attached to concrete 1/4 in. or 3/8 in. Allow for the thickness of the timber, any washers or spacers, and the required embedment into the concrete. Sound, solid concrete Check the screw’s published load data, spacing, and edge-distance requirements. Use corrosion-resistant material where moisture or treated timber may cause corrosion.
Utility brackets, equipment supports, and medium-duty attachments 3/8 in. or 1/2 in. Select the length from the attachment thickness and the product’s approved embedment range. Sound, solid concrete; some products are also approved for specific masonry Confirm that the screw is rated for the actual substrate and loading direction. Avoid damaged or weak concrete, and follow the installation instructions.
Fixtures installed in brick or concrete block Use only a diameter and screw type approved for the specific masonry unit. Account for the fixture thickness and the required engagement in the masonry; do not assume a concrete specification applies to block or brick. Solid masonry, or hollow masonry only when the screw is specifically approved for it Mortar joints, hollow cores, and thin masonry faces can reduce holding capacity. Verify the substrate and product approval before installation.
Outdoor fixtures exposed to rain or damp conditions Choose the diameter according to the load and the screw’s published ratings. Follow the product’s embedment and hole-depth requirements for the chosen substrate. Concrete or masonry appropriate to the selected screw Select a corrosion-resistant finish or material suitable for the exposure. For coastal, chemical, or persistently wet environments, check the manufacturer’s corrosion guidance.
Safety-critical or heavily loaded attachments, such as guardrails or structural supports Determine from an engineered design and approved load data. Determine from the design, including the required embedment, edge distance, spacing, and concrete condition. Specified concrete or masonry verified for the installation Do not size by rule of thumb. Use an approved anchoring system and have the design and installation requirements verified by a qualified professional.

General guidance: Concrete-screw capacity depends on the screw design, diameter, embedment, substrate strength and condition, installation quality, and load direction. Drill with the specified bit, keep within the stated hole-depth limits, and follow the screw manufacturer’s instructions and applicable building requirements.

Installing Concrete Screws for a Secure Hold

A secure concrete-screw installation starts before the drill runs. Check the screw’s specified diameter, length, embedment depth, and base-material compatibility. A screw that is too short may not develop reliable holding power. Mark the hole, then drill with the bit size recommended for that fastener. Keep the drill perpendicular. Dust matters. Even a neat-looking hole can hide powder at its bottom. Clear it with a vacuum or suitable brush before driving the screw. This small step is easy to rush, and worth checking twice.

Drive steadily with controlled pressure rather than forcing the screw. Stop when the head sits snug against the fixture; overtightening can strip the hole or damage nearby concrete. If resistance suddenly drops, back the screw out and inspect the hole instead of assuming the connection is sound. Concrete varies, and aggregate can make neighboring holes feel different. For a railing bracket or other safety-critical work, follow project specifications and fastener instructions. Check required edge distances and spacing. Wear eye protection, and use a hammer drill when the material and instructions call for one. A test hole may help reveal conditions, but it cannot replace checking the finished installation.

We will help turn your vision into reality

Contact Us